How to make a Viola da Gamba.

In 100 easy steps, only ten of which are illustrated and described here.

I've been intending to post a page like this for a few years, and waiting until I had the time to do it right. It's becoming clear to me-- it's never gonna happen. So I'm on to plan B: Don't worry about doing it right, just do what I can, as I can get to it. I'm starting with the bits and pieces that I have photos to illustrate. My intention is to keep adding a bit at a time until I have the whole process, from cutting up a tree to selling an instrument, photographed, described, and posted.

Some folks seem to believe in a RIGHT way to do things. I've got no problem with that. I'd love to know the right way. Unfortunately, the more old instruments I look at, the more people I talk to, the more shops I visit, the more books I read, the more confused I get. There seem to be an awful lot of right ways. I've given up on the idea. If there is a secret, a one true right way, I figure I am not going to find it. I'm left with knowing several ways to skin the cat, so to speak, and a belief that each has it's merits.

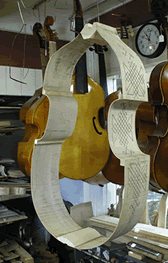
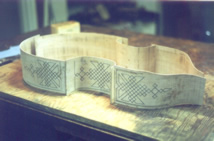
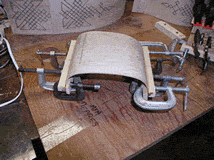
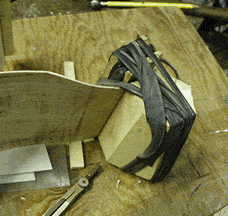
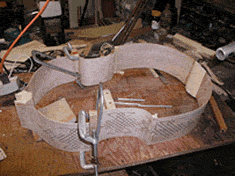
A form is often used to assemble the body of an instrument. Some folks favor inside forms, some outside forms. Both have good and legitimate claims to rightness, and both are good ways to work if you want to make a pile of essentially identical instruments. However, if you only want to make a few instruments of a particular style, and if you are not overly concerned about symmetry and consistency, it is possible to skip the inside/outside debate entirely-- in fact, it's possible to skip the form. Just don't do it, as they say. You won't be the first.


I've measured a bunch of instruments by Barak Norman, and traced their outlines onto one drawing. They are all different! Either he had a warehouse full of forms and didn't use any of them often, or he worked without forms. I've never found any solid information on how he (or any other old viol maker) worked, how their shop was arranged, what tools he had in his shop, or... or anything else about the nuts and bolts of workshop practice in an old viola da gamba shop. (If you know any of this, please contact me!). The best I can do is guess. What I'm describing here works, it may be similar to the way some folks worked in the past, it may not. I don't know .But it's a fast and easy way of making an instrument, and the results seem about right to me. If you try it, or not, and have comments or suggestions I'd love to hear from you.

I start by drawing the outline of the viol on a board, then bend the sides to match. (It's the same board that I assemble the bent top on). (BTW, I do the fancy purfling, most of it anyway, before I bend the sides. I know that it's been done the other way around, after bending, but that seems crazy to me. Eventually I'll get some photos of doing the purfling posted.)  

Next I make four subassemblies: the two center bouts and corner blocks, the upper bouts and top block, and the lower bouts and bottom block. Here is one of the center bouts with its corner blocks. The blocks are spruce. If you start by splitting a piece of spruce off a larger piece, and then cut your blocks from this split, the grain will be perfectly parallel to the length of the block. This makes shaping the block extremely easy-- you can cut from either end of the block without problems. If the grain isn't parallel to the length of the block your tools will want to dig in from one end, and shaping the block will be a bit more difficult. Most viols have lower bout shapes that are pretty nearly straight lines where they contact the corner. Straight is nice- it makes the blocks easy to shape. For this instrument the blocks are as simple as can be- one gluing surfaces is flat, the other is nearly flat.

 
  Here I'm gluing the two lower bouts to the bottom block. I used to make carefully shaped cauls for gluing the sides to the blocks. The cauls exactly mirror the shape of the block, and distribute the clamping pressure evenly. It's the perfect way to do the job, perhaps. Certainly the right way to do the job if you believe what most folks put in books. But I haven't made one of those cauls in years. Here I'm using a piece that presses against the bottom block in just two places-- the block is plenty stiff enough to distribute the pressure without warping. On the outside I'm using two flat cauls, and a fairly dense foam pad. I figure that the foam distributes the pressure better that a shaped caul would, and it makes the job much easier. A win win situation, far as I can see.

The upper bouts get glued to the top block, one at a time. I use strips cut out of bicycle inner tubes for clamping these (and many other things). I cut the block so that there are flat faces roughly parallel to the curved faces that the sides get glued to. This make clamping easy. Note that the bands don't touch the surfaces that the sides get glued to. This is important, as the tight bands will round any corners that they wrap over. I'll bevel the edges that they are on anyway, so they aren't doing any damage where they are (the bevel helps if the instrument ever needs repair- - it makes it easier to get a knife between the block and the back or belly).

The shape of the block varies a bit every time I do this. The shape of the belly side of the body is drawn (as part of the full outline of the instrument) on the board, I try to match that pretty closely. I do the other end of the block by eye- no measurements, just a sense of how much the block narrows towards the back. I do one side, then try to make the other side match. Clearly drawn center lines make the job much easier.


Since each block is slightly different from the last, a new set cauls for clamping would have to be made for each instrument. In a word, I'm lazy. I don't like making cauls. I use an adjustable caul here- it's a stack of sticks, each about 7mm thick, a bit longer than the top block is high. The sticks have deep V shaped notches in their ends, and are held together with a inner tube strip wrapped around the stack. I'm figuring that the picture is as indecipherable as the description, but that with both you might be able to figure it out?


  Now I've got the subassemblies ready to fit together. Here is one of the corner blocks (already glued to a center bout) in a vice. The end of the center bout needs to be trimmed so that it projects past the block exactly as high as the side that it will join to is thick. Best gauge for that is the side that it will join to-- I set it (or a scrap of the same material) on the block, then use it to guide the saw. It may get clearer after you read the next step...

Now connect the dots, so to speak. The stub of the side is just the right height- the same as the thickness of the side that it will miter to. Don't worry about 45 degree angles. Don't worry about anything. Just cut, with a very sharp, very flat, chisel on a line from the inside bottom of the stub to the outside top. Again, the pictures may make more sense than the words.


If I try to cut the miter all the way across I invariably break a chip out of the far side. This is easy to avoid- cut almost to the end, then come at it from the other side to take out the last little bit. Next step is to cut the other half of the miter. Here you have to use some imagination, as I didn't take a picture. I do the lower bouts first, but I suppose it would work well enough to do the uppers first. I place the side so that it just barely overhangs the edge of a workbench, then use a sharp, preferably very very sharp, plane to cut the miter. I guess at the angle, then try it against the other half of the miter (the one on the center bout) if the angle isn't right *leave the center bout alone*. It's perfect. Ought to be. Must be, if the height of the stub was right, and it was cut on a nice diagonal line from the bottom to the top. Trim the other side of the miter a bit, try again, keep at it until the joint is tight. You may not be able to get it as tight as you want the first few times you try. That's OK. Do the best you can, then try to do better next time.

I think of workmanship in the same way I think of handwriting. At some point you did pages and pages of o's, then p's. You did block letters before script. Now you just pick up a pen and write, thinking nothing of it, and probably doing a competent job of it. But if you want to copy John Hancock's famous signature, and haven't practiced calligraphy with a quill, you may have some problems. Trying to do it slowly, agonizing over it, isn't going to help. It either flows off the pen or it doesn't. Chisels and planes are pretty much like pens. Neat work, like good handwriting, takes more than just intention and attention - it take some practice to develop the required skills.

I do the miters on both sides of the subassembly before gluing, it's easier that way. Then I glue the corners together. Again, no fancy custom fitted cauls. I use a flat piece to clamp lower bout side of the corner, and a slightly rounded one, with a foam pad under it, for the center bout. I have several of these curved cauls, in different shapes. Rather than cut a new one to fit perfectly I use the closest I have, and let the foam pad deal with any slight mismatch. Couldn't be simpler.

You may want to get the miters perfect. A bad idea, I think. My advice: leave perfection to God. Try to reduce the imperfections to a level where they aren't going to cause problems. Then, if you can't let it go, reduce them a bit more, to the point where no one's going to notice. That's plenty good enough. If the miters don't meet perfectly you can do a lot to hide the irregularities after the glue dries. Mismatch in heights, so that a thin edge of one side sticks out? Use a scraper to cut it flush to the other side, then scrape the other side till the joint is right at the tip of the corner. A bit of a gap where the mitered sides don't meet tightly? Wait till the glue dries, then brush a little hot water on the corner, let it soften the glue for a few minutes, then use a burnisher to smear the tips of the miters together. If you don't tell anyone, they aren't going to know. Of course there are limits- but if it's pretty close, you can make it work.


I'm perhaps belaboring the point here, but maybe not: it's an important point. It's no more relevant to mitered corners than any other detail of workmanship, it comes up here only because this the first place where I'm talking about a moderately tricky job.(Cutting the top block is a bit of a trick too, but I passed over that pretty quickly.) Striving for perfection can get in the way. When you started with penmanship you needed to appreciate the niceness of a page full of round circles. It wasn't the time to pick up a quill and try to do a John Hancock. If you had decided that was what you needed to do, you would have been disappointed. I suggest seeing each instrument as a penmanship exercise, not an attempt to make a masterpiece. If you keep at it the masterpiece may come along when you are ready, and you can enjoy the wait. If you set out to do the masterpiece there are sure to be some disappointments ahead.


By now the upper block and sides have been sitting around for a day or more (maybe a lot more) and the shape will have changed. That's OK, it's normal, expected, unavoidable. But it's not something to ignore. I take them back to the bending iron and touch up the shape. I check the center and lower bouts too, and re-bend as necessary. I want the parts to match the outline that I drew on the board when I started. It's easy now, but once the whole assemble is put together one piece pushes on the next, and it's hard to tell why the overall shape is out of whack. You can chase problems around all day-- try to fix one bout, then the next, then back to the first. Better to try to get the shape right now, before you get everything hitched together. When the curves are nice-- just glue it.


The sides, and the blocks, need to be trimmed to the right height. I don't aim for a flat surface - I fit the sides to the belly and back, neither of which are flat. This viola da gamba has a bent belly. When I bend the belly I try to get it flat, but it never happens. To make things fit I wind up with the sides a bit higher at the center of the center bouts. Again, no one is going to notice. At least not unless they are looking more closely than is reasonable. This is an instrument, it's meant to be played, not examined with a magnifying glass. If the glue joints are tight, and everything looks OK from a few feet away, well, that's enough. The irregularities that show up when you get your nose up against the durn thing are not imperfections, they are features. The sides tend to flop around pretty easily at this stage, it may be easier to trim them if they are clamped to a board. I do one side, then turn it around and clamp the other side. For the top and bottom I just go at it with the plane, without trying to clamp anything. A very very extremely sharp plane makes the job easy. Now just carve a neck, glue it to the garland, add a fingerboard and a few other details, string it up and play. Then, start another. Repeat as necessary.